新入职公司,发了一本网易互娱的一本书,过几天要考试,我想了下,正好系统梳理一遍游戏美术设计的流程,就当解闷
1.C++编程简介
基本基础具备:
·学过某种procedure language(C 语言最佳)
·变量
·类型:int,float,char.struct …
·作用域
·循环
·流程控制: if-else,switch-case
·知道一个程序需要编译、链接才能被执行
·知道如何编译和链接
C++ Class
·class without pointer members
-Complex
·class with poniter members
-String
Classes之间的关系
-继承(inheritance)
-复合(composition)
-委托(delegation)
单一Class的设计被称为Object Based(基于对象)
符合Class相互之间有某种关联被称为Object Oriented(面向对象)
C++历史。。略过吧,基本就是发源于C,之前还有B语言,这些在C的时候已经有点了解了
面向对象不止C++还有JAVA跟我们最熟悉的C#
C++
C++语言
C++标准库


捏脸、换装系统总结
最近工作上遇到了与捏脸换装相关的工作内容,由于涉及到了以前未接触过的领域,在这做个工作总结。
捏脸这部分市面上一般有四种解决方案:
1.基于骨骼调整:调整骨骼的Scale、Rotation、Position
2.基于MESH差值:制作两个最大和最小值的Mesh,然后根据差值计算中间的Mesh,运行的时候生产最终的mesh
3.基于材质:简单的来说通过shader与贴图来控制肤色、瞳孔颜色、唇色等。
4.替换Mesh:这个属于是最简单的,但对于美术来说会产生巨量的工作量,一般是用作特殊配件,比如发型、时装、额外的饰品等。
捏脸的系统要保证运行时效率的同时,预览的速度也要做保证,有时候这两者会有一些冲突,可以通过多方案支持、内存换效率之类的方式来进行优化。如果是手游,最好关注下极限情况下的渲染效率和内存消耗,毕竟如果有材质参数的修改是无法合批的,基于骨骼或者mesh的修改的话对于内存也有一定的额外消耗。
基于骨骼调整
其实基于骨骼调整捏脸比较有参考价值的是《Honey Select》中的捏脸系统

对模型资源的规格进行分析, 发现存在大量的morph动画. 也就是说, HS中的的头部骨骼, 全部是用于捏脸的, 表情动画使用MorphTargets(BlendShape)驱动.
对于头部来说这种方式非常便捷,因为HS作为一款端游卖点就是高精度自定义,如果是手机端的话可能可以做相应的取舍。
下面是身体部分

查看其蒙皮信息可以发现, 所有影响顶点的骨骼名字全部带有”_s_”字样, 其父骨骼都是不带”_s_”的同名骨骼. 也就是说, HS的身体骨架中, 父骨骼负责动画, 子骨骼负责蒙皮.
基础的美术工作到这就差不多,但当我们进行调节的时候应该有一个更加平白的表达方式,比如说调节鼻子骨骼的信息,我们的确只需要调节NoseBase的Y值就好了,我们需要做的就是根据滑杆在最大值和最小值之间进行线性插值.

对于”眉毛角度Z轴”的调节, 这时只调节一根骨骼就不对了, 需要左右对称着来. 也就是说, 有一些调节项需要同时调节左右对称的两根骨骼.

对于”眉毛左右位置”, 如果在直线上两个端点之间进行插值, 很容易就跟面部三角形穿插了. 所以这里的插值路径只有最大值和最小值已经满足不了需求了, 而是需要按照曲线进行位置插值, 并且配合旋转插值贴合面部的法线方向. 也就是说, 一个调节项的插值可能是基于曲线(或多个关键帧), 而且可以同时影响骨骼Transform的多个分量.

眼睛的大小调节是最复杂的, 一共影响6根骨骼. 也就是说, 一个调节项是可以对应多根骨骼的.

我们总结一下, 脸型(或体型)调整原理就是:
- 本质上修改的是骨骼的Local Transform(Translation, Rotation, Scale)
- 一次只修改Local Transform的某个分量(或多个):Tx/Ty/Tz/Rx/Ry/Rz/Sx/Sy/Sz
- 使用滑杆在预设的调节范围之间进行插值
- 插值不一定是线性的, 可能是有多个关键帧
- 每个调节项可能对应不只一根骨骼
对衣服的资源进行分析可以发现两点值得学习的地方:

- 每件衣服都配有一个剔除掉被遮住的三角形的裸模, 一方面可以提升绘制性能, 一方面能避免衣服和皮肤两层三角形的穿插
- 裙摆/披风/长衫等都是共用同样的8条物理骨骼, 算是比较传统的布料模拟做法
基于MESH差值
捏脸主要区域集中在正面,如果美术有能力统一脸部拓扑,使用Mesh差值通过顶点动画实现预设头更好的解决办法。取得新的顶点位置后,要重新计算Mesh法线。

即使头发使用mesh,头皮依然需要相应颜色的贴图映衬。对于短发寸头,通过对贴图改变发际线的形状也可以取得更多头发的多样性。
捏脸到底使用Mesh差值还是使用骨骼调整,具体还是要看引擎的要求。有的引擎对于Morph Targets优化更好,有的对于骨骼动画优化更好。同时这也取决于你的脸部动画是通过骨骼驱动的还是Morph驱动的。
如果没有性能要求,谁的效果好? 答案肯定是基于Mesh差值的结果。
关于楚留香传的捏脸系统,在额头附近同时调节两个控制器会造成异常的凸起。 这是因为两个控制器同时对相同一部分顶点造成位移而形成的的Double Transformation。可以在美术上normalize两个控制器的影响,或者在程序上限值两个控制器的调整范围。
捏脸是个系统工程,需要美术,程序,设计师多方面的讨论。
说一个不容易发现的细节:有的预设头如果眼睛的距离本身很近,那么控制器是在默认状态就会锁住你的范围,避免你捏出一个眼距过大过小的怪物。
Custom Stylized Lit(STILL WORKING)
该shader主要是为了解决项目中的通用材质的自定义问题,主要是用来实现较为写实的风格,基于URP Lit Shader制作而成,可以控制光的亮度、控制高光与菲涅尔等,并且支持预制笔刷。

1,该shader使用了3种颜色,用阈值与光滑度来remapping表面光照。

2,该shader可以控制Specular的方向与Intensity
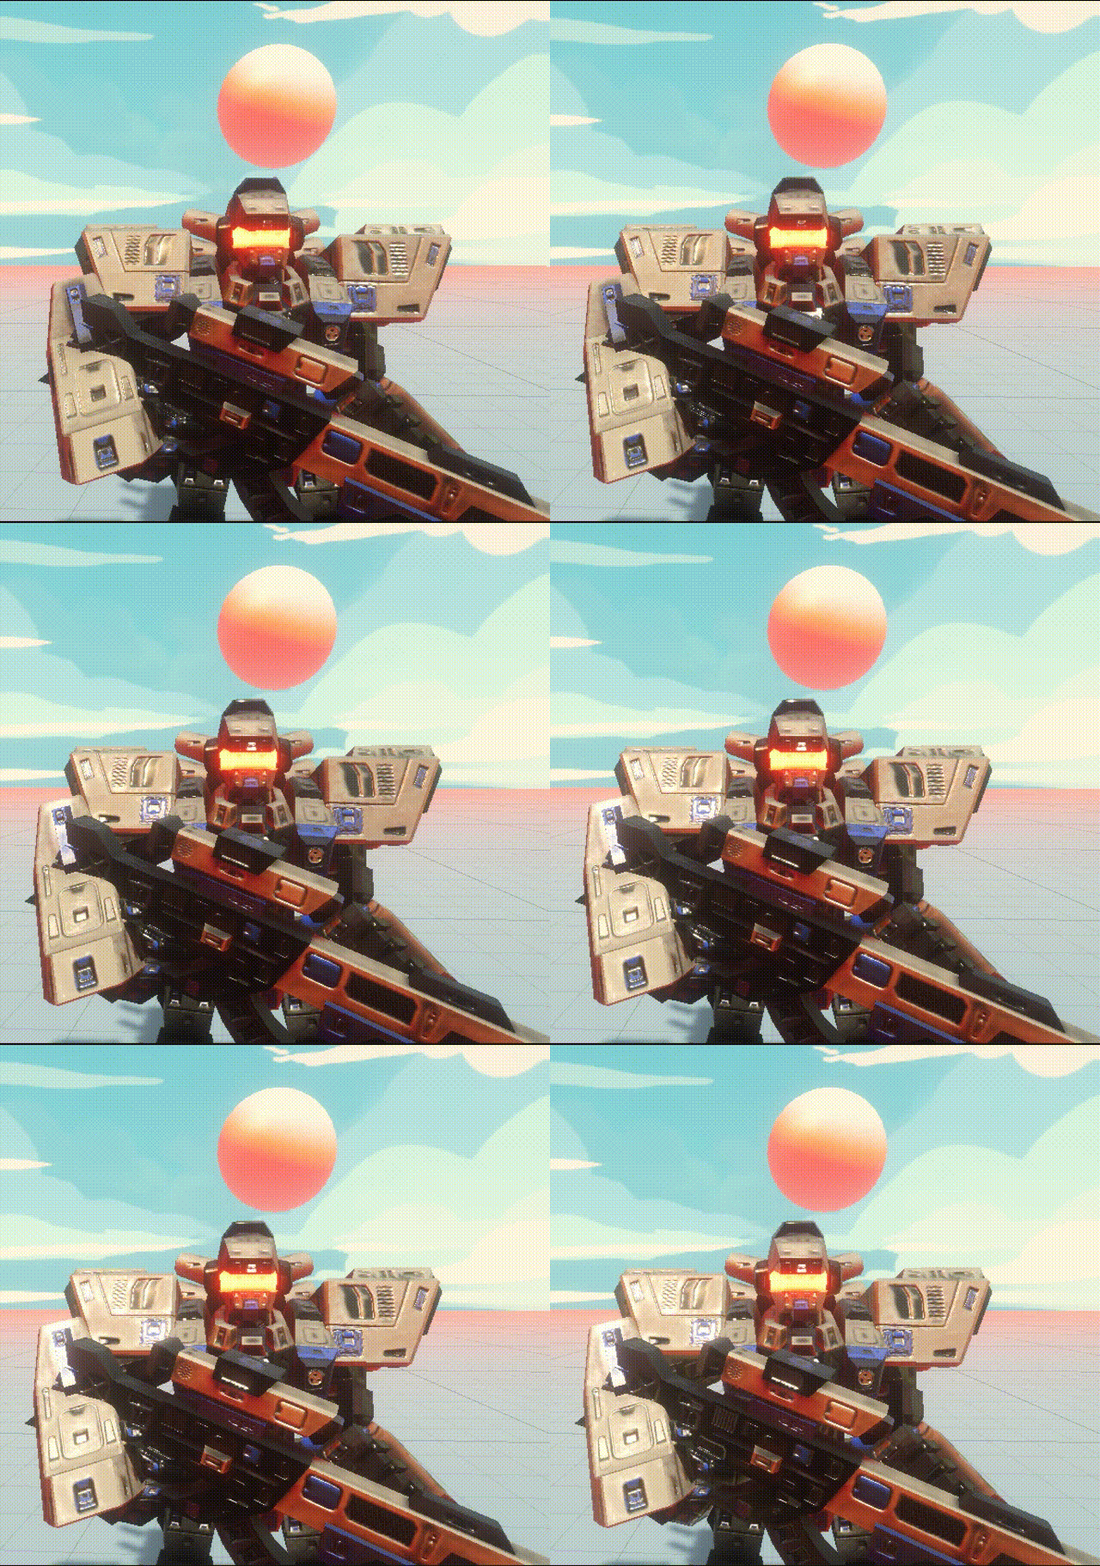
3,通过Fresnel调节暗部细节


Rtr4读书笔记序言
开个坑,写一下RTR4的读书笔记。RTR4指的是《Real Time Rendering(4th Edition)》这本书,国内据我所知只有第二版的翻译,第三版的中文版应该会在近期上,所以第四版是纯英文的版本。这个读书笔记会结合他人的读书笔记外加自己的阅读理解,主要参考的读书笔记是毛星云大佬的《<Real Time Rendering 3rd>提炼总结》。如果有人能看到,希望大佬们斧正。

其中标星号的为相对于rtr第三版改动幅度比较大的章节,我之后会专门针对之前相对薄弱的章节进行梳理
Gerstner wave
Shader "Unlit/GerstnerWaveStandard"
{
    Properties
    {
        _MainTex ("Texture", 2D) = "white" {}
        [Header(BaseShading)]
        _BaseMap ("Example Texture", 2D) = "white" { }
        [HDR]_BaseColor ("Base Colour", Color) = (0, 0.66, 0.73, 1)
        _WaterFogColor ("Water Fog Colour", Color) = (0, 0.66, 0.73, 1)
        _FogDensity ("Fog Density", range(0, 1)) = 0.1
        _NormalMap ("Normal Map", 2D) = "white" { }
        _NormalScale ("Normal Scale", Range(0, 1)) = 0.1
        _Shininess ("High Light Roughness", Range(0, 0.1)) = 0.01
        [Space(20)]
        [Header(Reflection)]
        _Skybox ("Skybox", Cube) = "white" { }
        [Header(Refractive)]
        _AirRefractiveIndex ("Air Refractive Index", Float) = 1.0
        _WaterRefractiveIndex ("Water Refractive Index", Float) = 1.333
        _FresnelPower ("Fresnel Power", Range(0.1, 50)) = 5
        _RefractionStrength ("Refraction Strength", Range(0, 1)) = 0.1

        [Space(20)]
        [Header(SSS)]
        _FrontSubsurfaceDistortion ("Front Subsurface Distortion", Range(0, 1)) = 0.5
        _BackSubsurfaceDistortion ("Back Subsurface Distortion", Range(0, 1)) = 0.5
        _FrontSSSIntensity ("Front SSS Intensity", float) = 0.2
        _HeightCorrection ("SSS Height Correction", float) = 6

        [Space(20)]
        [Header(Foam)]
        _FoamIntensity ("Foam Intensity", float) = 0.5
        _FoamNoiseTex ("Foam Noise", 2D) = "white" { }

        [Space(20)]
        [Header(Caustic)]
        _CausticIntensity ("Caustic Intensity", float) = 0.5
        _CausticTex ("Caustic Texture", 2D) = "white" { }
        _Caustics_Speed ("Caustics Speed,(x,y)&(z,w)", Vector) = (1, 1, -1, -1)

        [Space(20)]
        [Header(Waves)]
        _Speed ("Speed", float) = 0.2
        _Frequency ("Frequency", float) = 2
        _WaveA ("Wave A (dir, steepness, wavelength)", Vector) = (1, 0, 0.5, 10)
        _WaveB ("Wave B", Vector) = (0, 1, 0.25, 20)
        _WaveC ("Wave C", Vector) = (1, 1, 0.15, 10)
        _WaveD ("Wave D", Vector) = (0, 1, 0.25, 20)
        _WaveE ("Wave E", Vector) = (1, 1, 0.15, 10)
        _WaveF ("Wave F", Vector) = (0, 1, 0.25, 20)
        _WaveG ("Wave G", Vector) = (1, 1, 0.15, 10)
        _WaveH ("Wave H", Vector) = (0, 1, 0.25, 20)
        _WaveI ("Wave I", Vector) = (1, 1, 0.15, 10)
        _WaveJ ("Wave J", Vector) = (1, 1, 0.15, 10)
        _WaveK ("Wave K", Vector) = (1, 1, 0.15, 10)
        _WaveL ("Wave L", Vector) = (1, 1, 0.15, 10)
        [Space(20)]
        [Header(Tessellation)]
        _TessellationUniform ("Tessellation Uniform", Range(1, 64)) = 1
        _TessellationEdgeLength ("Tessellation Edge Length", Range(5, 100)) = 50
        [Toggle(_TESSELLATION_EDGE)]_TESSELLATION_EDGE ("TESSELLATION EDGE", float) = 0


        [Space(20)]
        [Header(Others)]
        _shadowAttenuation("shadowAttenuation",float)=0.2
        _CameraOpaqueTexture("_CameraOpaqueTexture",2D)="white"{}
    }
    SubShader
    {
        Tags { "RenderType" = "Transparent"  "RenderQueue" = "Transparent" }

        ZWrite Off
        ZTest On
        CGPROGRAM
        #include "Lighting.cginc"
        #include "unityCg.cginc"
        float4 _BaseMap_ST, _FoamNoiseTex_ST, _CausticTex_ST;
        float4 _BaseColor, _WaterFogColor, _Caustics_Speed;
        float4 _NormalMap_ST;
        float4 _WaveA, _WaveB, _WaveC, _WaveD, _WaveE, _WaveF, _WaveG, _WaveH, _WaveI, _WaveJ, _WaveK, _WaveL;
        float _Speed, _Frequency, _NormalScale, _AirRefractiveIndex, _WaterRefractiveIndex, _FresnelPower;
        float _RefractionStrength, _FogDensity, _Shininess, _FrontSubsurfaceDistortion, _BackSubsurfaceDistortion;
        float _FrontSSSIntensity, _HeightCorrection, _FoamIntensity, _CausticIntensity;
        ENDCG

        Pass
        {
            Name "Example"
            Tags { "LightMode" = "ForwardBase" }

            ZWrite off
            CGPROGRAM
            #pragma vertex vert
            #pragma fragment frag
            // make fog work
           // #pragma multi_compile_fog

            #include "UnityCG.cginc"
            #include "AutoLight.cginc"
            #include "Lighting.cginc"

            struct a2v
            {
                float4 positionOS: POSITION;
                float2 uv: TEXCOORD0;
                float3 normal: NORMAL;
                float4 color: COLOR;
            };

            struct v2f
            {
                float4 positionCS: SV_POSITION;
                float2 uv: TEXCOORD0;
                float3 normalWS: TEXCOORD1;
                float3 positionWS: TEXCOORD2;
                float3 tangentWS: TEXCOORD3;
                float4 scrPos: TEXCOORD4;
                float heightOS: TEXCOORD5;
                float fogFactor: TEXCOORD6;
                float4 color: COLOR;
            };

            samplerCUBE _Skybox;
            float4 _Skybox_ST;
            sampler2D _CameraOpaqueTexture;
            float4 _CameraOpaqueTexture_ST;
            sampler2D _FoamNoiseTex;
            float2 _FoamNoiseTex_ST;
            sampler2D _CausticTex;
            float4 _CausticTex_ST;
            float _Speed, _Frequency, _NormalScale, _AirRefractiveIndex, _WaterRefractiveIndex, _FresnelPower;
            float4 _WaveA, _WaveB, _WaveC, _WaveD, _WaveE, _WaveF, _WaveG, _WaveH, _WaveI, _WaveJ, _WaveK, _WaveL;
            float4 _NormalMap_ST;
            float _RefractionStrength, _FogDensity, _Shininess, _FrontSubsurfaceDistortion, _BackSubsurfaceDistortion;
            float4 _BaseColor, _WaterFogColor, _Caustics_Speed;
            float _shadowAttenuation;
            float _FrontSSSIntensity, _HeightCorrection, _FoamIntensity, _CausticIntensity;


            sampler2D _MainTex;
            float4 _MainTex_ST;
            sampler2D _NormalMap;

            //-------------GenrateGerstnerWave-------------
            float3 GerstnerWave(
                float4 wave, float3 p, inout float3 tangent, inout float3 binormal
            )
            {
                float steepness = wave.z;
                float wavelength = wave.w;
                float k = 2 * UNITY_PI / wavelength;
                float c = sqrt(9.8 / k);
                float2 d = normalize(wave.xy) * _Frequency;
                float f = k * (dot(d, p.xz) - c * _Time.y * _Speed);
                float a = steepness / k;

                tangent += float3(
                    - d.x * d.x * (steepness * sin(f)),
                    d.x * (steepness * cos(f)),
                    - d.x * d.y * (steepness * sin(f))
                );
                binormal += float3(
                    - d.x * d.y * (steepness * sin(f)),
                    d.y * (steepness * cos(f)),
                    - d.y * d.y * (steepness * sin(f))
                );
                return float3(
                    d.x * (a * cos(f)),
                    a * sin(f),
                    d.y * (a * cos(f))
                );
            }

            //-----------CalculateFresnel------------------
            float CalculateFresnel(float3 viewDir, float3 normal)
            {
                float R_0 = (_AirRefractiveIndex - _WaterRefractiveIndex) / (_AirRefractiveIndex + _WaterRefractiveIndex);
                R_0 *= R_0;
                return R_0 + (1.0 - R_0) * pow((1.0 - saturate(dot(viewDir, normal))), _FresnelPower);
            }


            half3 Highlights(half3 positionWS, half roughness, half3 normalWS, half3 viewDirectionWS)
            {
                //Light mainLight = GetMainLight();
                half roughness2 = roughness * roughness;
                half3 halfDir = normalize(_WorldSpaceLightPos0.xyz + viewDirectionWS);
                half NoH = saturate(dot(normalize(normalWS), halfDir));
                half LoH = saturate(dot(_WorldSpaceLightPos0.xyz, halfDir));
                // GGX Distribution multiplied by combined approximation of Visibility and Fresnel
                half d = NoH * NoH * (roughness2 - 1) + 1.0001;
                half LoH2 = LoH * LoH;
                half specularTerm = roughness2 / ((d * d) * max(0.1, LoH2) * (roughness + 0.5) * 4);
                specularTerm = min(specularTerm, 10);

                return specularTerm * _LightColor0.rgb * _shadowAttenuation;
            }


            //-------------GetOddNegativeScale----------------
            float GetOddNegativeScale()
            {
                return unity_WorldTransformParams.w;
            }

            //------------CreateTangentToWorld---------------
            float3x3 CreateTangentToWorld(float3 normal, float3 tangent, float flipSign)
            {
            // For odd-negative scale transforms we need to flip the sign
            float sgn = flipSign * GetOddNegativeScale();
            float3 bitangent = cross(normal, tangent) * sgn;

            return float3x3(tangent, bitangent, normal);
            }

            //-----------TransformTangentToWorld----------
            float3 TransformTangentToWorld(float3 dirTS, float3x3 tangentToWorld)
            {
                // Note matrix is in row major convention with left multiplication as it is build on the fly
                return mul(dirTS, tangentToWorld);
            }
            float3 GetCameraPositionWS()
            {
                return _WorldSpaceCameraPos;
            }

            //-----------SampleSceneDepth--------------
            sampler2D _CameraDepthTexture;
            sampler2D sampler_CameraDepthTexture;
            float SampleSceneDepth(float2 uv)
            {
                return tex2D(_CameraDepthTexture, UnityStereoTransformScreenSpaceTex(uv)).r;
            }


            float SubsurfaceScattering(float3 viewDir, float3 lightDir, float3 normalDir,
            float frontSubsurfaceDistortion, float backSubsurfaceDistortion, float frontSSSIntensity, float thickness)
            {
            //分别计算正面和反面的次表面散射
            float3 frontLitDir = normalDir * frontSubsurfaceDistortion - lightDir;
            float3 backLitDir = normalDir * backSubsurfaceDistortion + lightDir;
            float frontsss = saturate(dot(viewDir, -frontLitDir));
            float backsss = saturate(dot(viewDir, -backLitDir));

            float result = saturate(frontsss * frontSSSIntensity + backsss) * thickness;
            return result;
            }
            /*
            //------------Light------------------
            struct Light
            {
                half3   direction;
                half3   color;
                half    distanceAttenuation;
                half    shadowAttenuation;
            };

            //-----------GetMainLight-------------
            Light GetMainLight()
            {
                Light light;
                light.direction = _WorldSpaceLightPos0.xyz;
                // unity_LightData.z is 1 when not culled by the culling mask, otherwise 0.
                light.distanceAttenuation = unity_LightData.z;
            #if defined(LIGHTMAP_ON) || defined(_MIXED_LIGHTING_SUBTRACTIVE)
                // unity_ProbesOcclusion.x is the mixed light probe occlusion data
                light.distanceAttenuation *= unity_ProbesOcclusion.x;
            #endif
                light.shadowAttenuation = 1.0;
                light.color = _MainLightColor.rgb;

                return light;
            }
            */

            v2f vert (a2v v)
            {
                v2f o;
                float3 tangent = float3(1, 0, 0);
                float3 binormal = float3(0, 0, 1);
                float3 p = v.positionOS;

                p += GerstnerWave(_WaveA, v.positionOS.xyz, tangent, binormal);
                p += GerstnerWave(_WaveB, v.positionOS.xyz, tangent, binormal);
                p += GerstnerWave(_WaveC, v.positionOS.xyz, tangent, binormal);
                p += GerstnerWave(_WaveD, v.positionOS.xyz, tangent, binormal);
                p += GerstnerWave(_WaveE, v.positionOS.xyz, tangent, binormal);
                p += GerstnerWave(_WaveF, v.positionOS.xyz, tangent, binormal);
                p += GerstnerWave(_WaveG, v.positionOS.xyz, tangent, binormal);
                p += GerstnerWave(_WaveH, v.positionOS.xyz, tangent, binormal);
                p += GerstnerWave(_WaveI, v.positionOS.xyz, tangent, binormal);
                p += GerstnerWave(_WaveJ, v.positionOS.xyz, tangent, binormal);
                p += GerstnerWave(_WaveK, v.positionOS.xyz, tangent, binormal);
                p += GerstnerWave(_WaveL, v.positionOS.xyz, tangent, binormal);


                o.heightOS = p.y;
                float3 normal = normalize(cross(binormal, tangent));
                UNITY_INITIALIZE_OUTPUT(v2f, o);
                o.positionCS = UnityObjectToClipPos(p);
                o.normalWS = UnityObjectToWorldNormal(v.normal);
                o.positionWS = mul(unity_ObjectToWorld,v.positionOS);
                o.scrPos = ComputeScreenPos(o.positionCS);
                o.uv = TRANSFORM_TEX(v.uv, _MainTex);
                //UNITY_TRANSFER_FOG(o,o.positionCS);
                return o;
            }

            fixed4 frag (v2f i) : SV_Target
            {
                float3 normalWS = normalize(i.normalWS);
                //-------------normal----------
                float3x3 TtoW = CreateTangentToWorld(i.normalWS, i.tangentWS, 1);
                fixed4 normalTS = tex2D(_NormalMap,i.uv);
                normalTS.xyz = normalize(UnpackNormal(normalTS));
                normalWS = lerp(normalWS,normalize(TransformTangentToWorld(normalTS,TtoW)),_NormalScale);
                normalWS = normalize(normalWS);

                //------------reflection-----------
                float3 viewDirectionWS = normalize(GetCameraPositionWS() - i.positionWS.xyz);
                float3 reflectDir = reflect(-viewDirectionWS, normalWS);
                float4 reflectCol = texCUBE(_Skybox,reflectDir);
                //------------refraction------------
                float2 scrPos = i.scrPos / i.scrPos.w;
                float depth = SampleSceneDepth(scrPos);
                depth = LinearEyeDepth(depth);
                float surfaceDepth = i.scrPos.w;
                float depthDiffer = depth - surfaceDepth;
                float2 uvOffset = normalWS.xz * _RefractionStrength * saturate(depthDiffer);
                float2 offsetPos = scrPos + uvOffset;
                float offsetPosDepth = SampleSceneDepth(offsetPos);
                offsetPosDepth = LinearEyeDepth(offsetPosDepth);
                offsetPos = scrPos + uvOffset * step(surfaceDepth, offsetPosDepth);
                float4 refractCol = tex2D(_CameraOpaqueTexture,offsetPos);
                float depthFactor = depth / surfaceDepth;
                float3 underPos = (i.positionWS - GetCameraPositionWS()) * depthFactor + GetCameraPositionWS();
                float2 causticSampler = (underPos.xy + underPos.xz + underPos.yz) / 100 * _CausticTex_ST.xy;
                float4 caustic1 = tex2D(_CausticTex, causticSampler + _Caustics_Speed.xy * _Time.y/30);
                float4 caustic2 = tex2D(_CausticTex, causticSampler + _Caustics_Speed.zw * _Time.y/30);
                float4 caustic = min(caustic1, caustic2);

                //------------fog-------------
                float offsetDepthDiffer = surfaceDepth > offsetPosDepth ? depthDiffer: offsetPosDepth - surfaceDepth;
                float fogFactor = saturate(1 - exp(-offsetDepthDiffer * _FogDensity / 10)) * _shadowAttenuation;
                float4 waterCol = lerp(_WaterFogColor, _BaseColor, fogFactor);
                refractCol = lerp(waterCol, waterCol * refractCol, saturate(fogFactor));
                refractCol += caustic * pow((1 - saturate(fogFactor)), 10);

                //------------specular----------
                float3 halfDir = normalize(viewDirectionWS + normalize(_WorldSpaceLightPos0.xyz));
                float3 specular = Highlights(i.positionWS, _Shininess, normalWS, viewDirectionWS);
                specular *= _shadowAttenuation;

                //------------SSS---------------
                float SSSValue = SubsurfaceScattering(viewDirectionWS, _WorldSpaceLightPos0.xyz, normalWS, _FrontSubsurfaceDistortion,
                _BackSubsurfaceDistortion, _FrontSSSIntensity, saturate(i.heightOS - _HeightCorrection));
                SSSValue *= _shadowAttenuation;
                float fresnel = CalculateFresnel(viewDirectionWS, normalWS);
                float4 scatterCol = lerp(refractCol, reflectCol, saturate(fresnel));

                float3 shading = scatterCol.rgb + specular + SSSValue * _LightColor0.rgb;

                //------------Foam------------------
                float foamOffset = tex2D(_FoamNoiseTex, i.uv * _FoamNoiseTex_ST.xy + _Time.y).x;
                shading = lerp(shading, float3(0.8, 0.8, 0.8), pow(saturate(_FoamIntensity * foamOffset -depthDiffer) * 2, 3) * saturate(depthDiffer));
                //shading = MixFog(shading.rgb, i.fogFactor);
                // sample the texture
                fixed4 col = tex2D(_MainTex, i.uv);
                // apply fog
                //UNITY_APPLY_FOG(i.fogCoord, col);
                return (shading.rgb,1);
            }
            ENDCG
        }
    }
}
关于一般水体渲染的技术总结
水体渲染一半的技术节点在于波纹、水体边缘与折射。
波纹笔者现已知的方法有 凹凸纹理贴图、正弦波、FFT这三种,其中最为简单的是纹理贴图只要对其法线进行采样,然后制作UV动画,在制作UV动画的时候,有一个小trick,同一张Normal图可以采样两次,然后分别做主动与扰动。其次是正弦波,正弦波更多的是进行顶点动画,改变定点数据的值来得到,一般的伪代码为 WaveValue = Sin(_Time.y*_Speed+v.vertex.x*_Frequency)*_Amplitude.。期间可以叠加一些常见的sin波或者cos波来进行扰动,他的特点是平滑圆润,适合表达像池塘一样平静的水面。而正弦波的进化版则是Gerstner波,Gerstner波是将水平位置进行挤压,使得波峰变尖,波谷变宽,适合模拟海洋,该公式在《GPU Gems 1》出现过
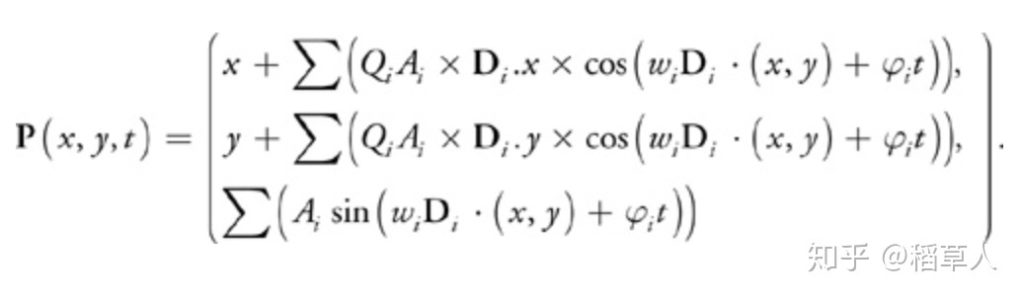
而FTT海洋则是我接下来要研究的对象。之后会另出一篇文章来详解。
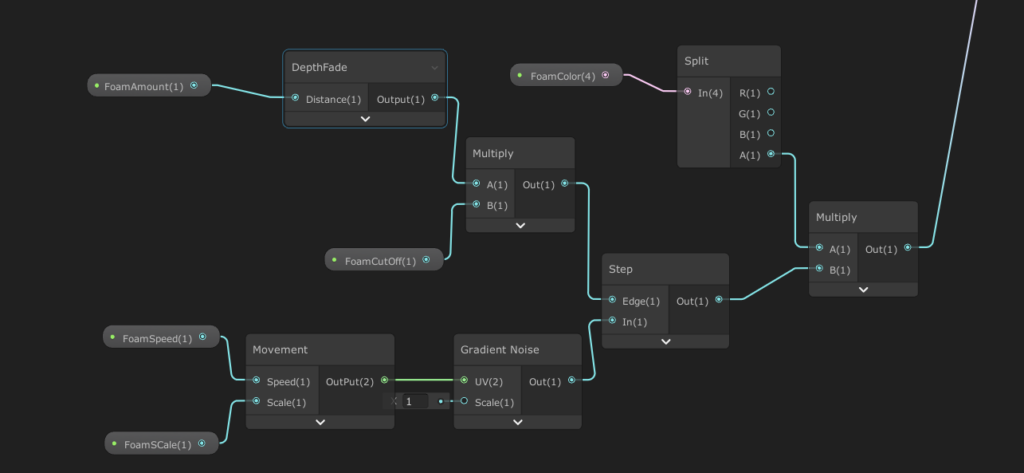
水体边缘检测,也就是海浪。海浪我之前有做过两种,一种是描出水体与山体的接触边缘,利用通道区分海浪与海面,相当于做一个mask然后再mask上进行叠加noise图造成扰动效果。另外一种是用深度检测,直接检测出边缘,类似边缘检测的方法。顺带边缘检测一般有几种方法,最基础的方法是用Sobel算子对屏幕图像进行边缘检测,但这种方法会得到许多不希望得到的边缘线而且挺受光源的影响。还有一种卷积检测的方法是Roberts算子,本质就是计算左上角核右下角的差值,乘上右上角和左下角的插值,作为评估依据。取对角方向的深度或者法线值,比较他们之间的插值,如果超过某个阈值,就认为有一条边。而Sobel检测算子是利用相邻像素之间的差值用梯度表示,梯度的绝对值越大,则越有可能是边缘处。这种方法叫做基于图像处理的轮廓渲染。无论怎么改变算子还是其他的,这种方法的劣势是一些深度和法线变化很小的轮廓无法被检出,其他的算法还有
1.基于观察角度和表面法线的轮廓线渲染;这种方法是用视角方向和表面法线的点乘结果得到轮廓信息。可以在一个PASS中得到渲染结果,但局限性很大。
2.过程式几何轮廓渲染;这种方法的核心是用两个PASS渲染,一个剔除正面渲染背面然后沿着法线向外拓展形成轮廓线,还有一个PASS就正常渲染。
3.基于轮廓边检测的轮廓线渲染,这个方法,我们只需要检查和这条边相邻的两个三角面片是否满足 (n0·v>0)≠(n1·v>0),n0与n1分别表示两个相邻三角面片的法向,v是从视角到该边上任意一个顶点的方向。这个条件主要是检车两个相邻的三角面片是否一个正面一个背面。我们可以在几何着色器中完成这个操作,缺点是实现复杂,而且会出现动画连贯性的问题,由于逐帧单独提取轮廓,所以在帧与帧之间会出现条约性。
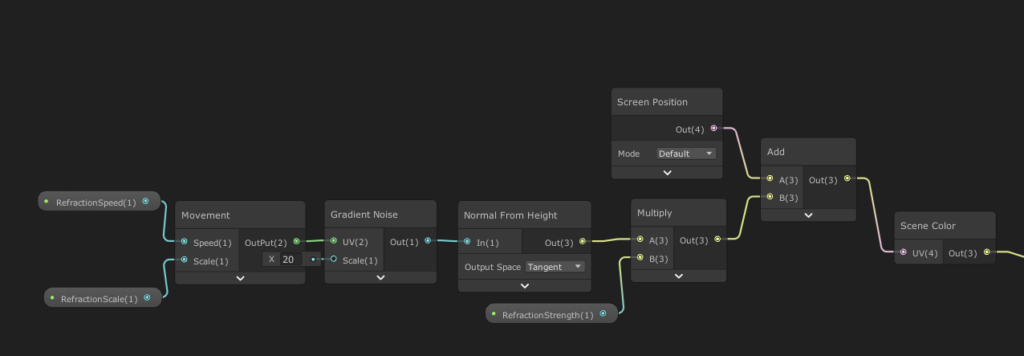
之前所作的海浪则是通过深度图,需要在摄像机开启深度渲染,基本思路是用摄像机距离地形的距离减去摄像机距离平面的距离,取绝对值,越接近0则越可能是边缘。但有些低端设备不支持深度图渲染,所以用的时候要比较慎用。而且在开启深度纹理的时候需要在FallBack设置为Diffuse才能够体现深度。
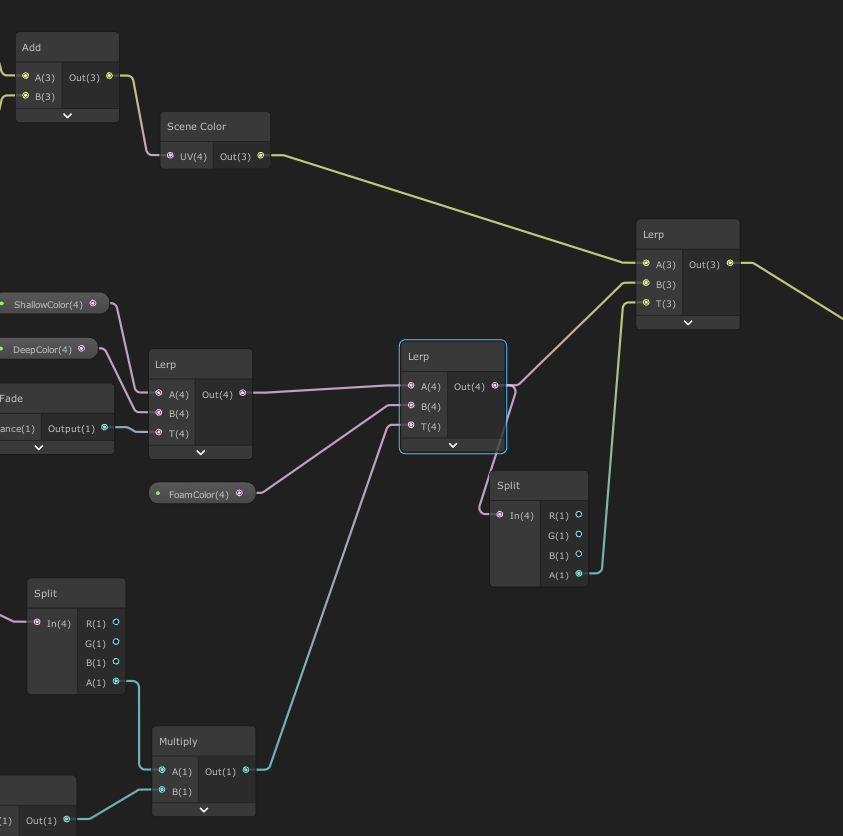
接下来是折射
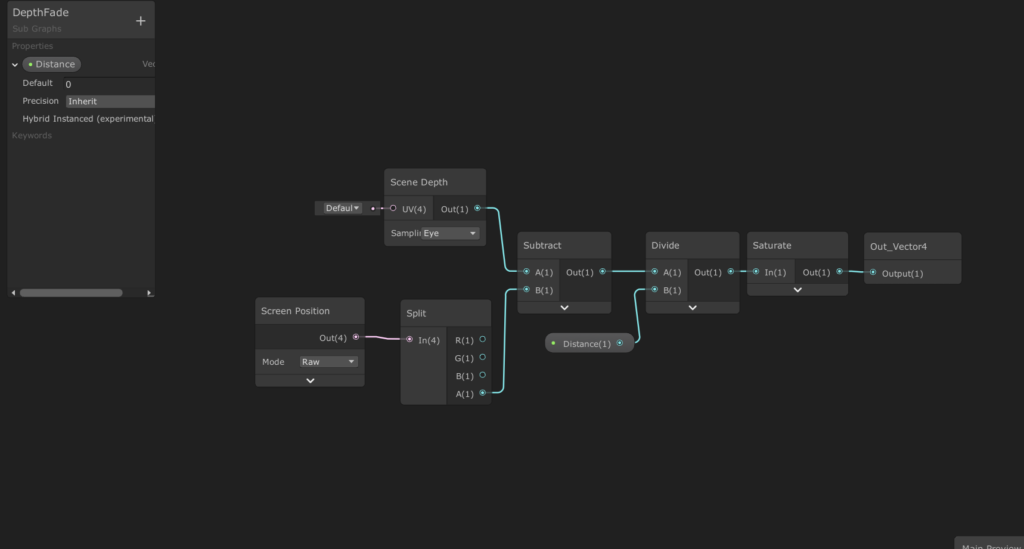
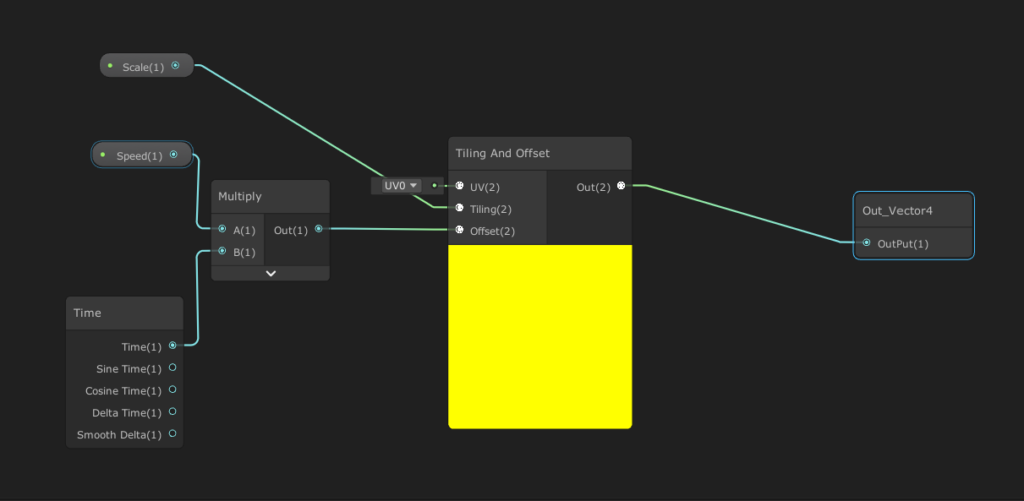
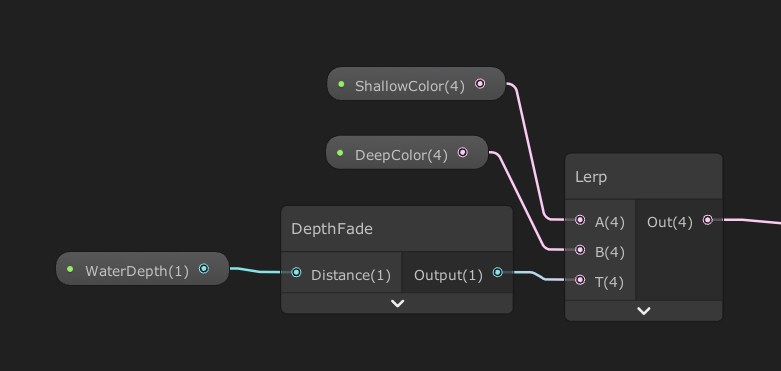
WaterDepth=SceneDepth(Eye)-Screen Position
Fur and hair SHADER————关于毛发渲染
ShaderGraph’s CustomFunction
最近在准备作品集,想要将作品的效果达到最好,在UE4中不用考虑这么多,但在unity中运用HDRP能够更加快速的达到想要满意的效果。但HDRP中进行code存在着转换问题,除了默认的shader,自定义shader或多或少存在着“小粉红”的情况
Shader入门—7.使用Noise图
在我们想要达成一种比较随机的效果的时候,可以运用一张随机分布灰度的图片来进行模拟,相信美术的同学应该经常用到这种效果,偏程序的可以将其理解为,噪声纹理+某种检测,